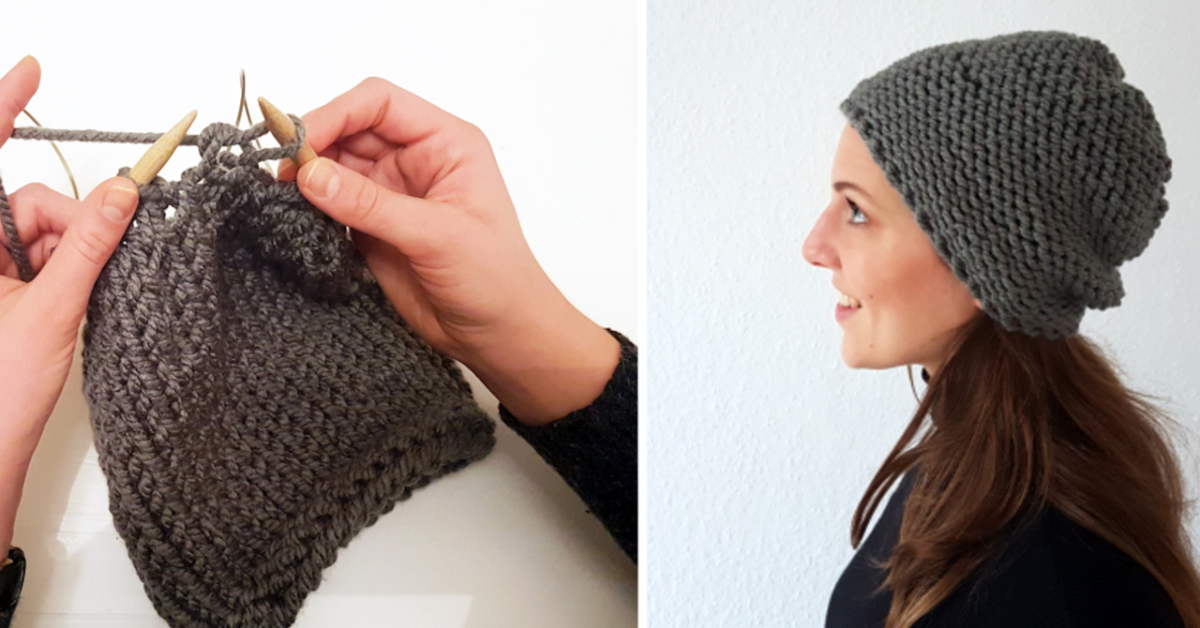
Beanies are a timeless fashion accessory that never go out of style. They are perfect for keeping your head and ears warm during the cold winter months, and they come in a wide variety of colors and styles. If you’re interested in learning how to knit a beanie, this guide is for you. In this article, we’ll take you through the steps of knitting a basic beanie, and we’ll provide you with some tips and tricks to make the process easier.
Before you start knitting your beanie, you’ll need to gather a few supplies. Here’s what you’ll need:
- Yarn: You can use any type of yarn you like, but we recommend using a bulky or super bulky weight yarn to make your beanie warm and cozy.
- Knitting needles: You’ll need a set of circular knitting needles in the appropriate size for your yarn. We recommend using a 16-inch circular needle.
- Stitch marker: This will help you keep track of your rounds as you knit.
- Tapestry needle: This will be used to weave in the ends of your yarn when you’re finished knitting.
- Scissors: You’ll need a pair of scissors to cut your yarn.
Once you’ve gathered your supplies, you’re ready to get started.
Step 1: Cast On
To begin, you’ll need to cast on your stitches. The number of stitches you’ll need to cast on will depend on the size of your head and the gauge of your yarn. As a general rule, you’ll want to cast on enough stitches to create a circumference that is slightly smaller than your head.
For example, if your head measures 22 inches around, you’ll want to cast on enough stitches to create a circumference of around 20 inches. To determine the number of stitches you’ll need to cast on, you’ll need to use your gauge swatch. If you’re not familiar with gauge swatches, we recommend reading up on them before you start knitting your beanie.
Once you’ve determined the number of stitches you’ll need to cast on, use the long tail cast-on method to cast on your stitches. This method creates a sturdy edge that is perfect for hats and other projects that will receive a lot of wear and tear.
Step 2: Join in the Round
After you’ve cast on your stitches, you’ll need to join them in the round. To do this, slip the first stitch from your right needle onto your left needle, being careful not to twist your stitches. Hold your needles parallel to each other and use your right needle to knit the first stitch on your left needle. This will join your stitches in the round.
To help you keep track of your rounds, place a stitch marker on your right needle after you’ve completed the first round.
Step 3: Knit the Body of the Beanie
Now that your stitches are joined in the round, you can start knitting the body of your beanie. You’ll want to knit every stitch in every round until your beanie is the desired length.
If you’re using a basic knit stitch, the body of your beanie will be worked in stockinette stitch. This means you’ll knit every stitch in the first round, and purl every stitch in the second round. Repeat these two rounds until your beanie is the desired length.
If you want to add some texture to your beanie, you can experiment with different stitch patterns. Some popular options include ribbing, seed stitch, and moss stitch.
Step 4: Decrease the Stitches
Once your beanie is the desired length, it’s time to start decreasing the stitches to create the crown of the hat. To do this
How to Knit a Beanie for Beginners:
A Step-by-Step Guide
Beanies are a great way to keep warm during the colder months, and knitting your own beanie can be a rewarding experience. If you’re a beginner knitter, don’t worry! We’ve got you covered with this step-by-step guide on how to knit a beanie.
Supplies You’ll Need:
- Yarn: Choose a bulky or super bulky weight yarn in a color of your choice. You’ll need approximately 100-150 yards of yarn.
- Knitting needles: We recommend using a 16-inch circular needle, but you can also use double-pointed needles if you prefer.
- Stitch marker: This will help you keep track of your rounds as you knit.
- Tapestry needle: This will be used to weave in the ends of your yarn when you’re finished knitting.
- Scissors: You’ll need a pair of scissors to cut your yarn.
Step 1: Gauge Swatch
Before you start knitting your beanie, it’s important to knit a gauge swatch. This will help you determine how many stitches you need to cast on and how many rounds you need to knit to achieve the desired size of your beanie.
To make a gauge swatch, cast on 20 stitches and knit in stockinette stitch (knit one row, purl one row) for approximately four inches. Measure your stitches per inch (SPI) by counting how many stitches fit into one inch of the swatch. This will help you determine how many stitches you need to cast on for your beanie.
Step 2: Cast On
Now that you know how many stitches you need to cast on, use the long-tail cast-on method to cast on your stitches. This creates a sturdy edge that is perfect for hats and other projects that will receive a lot of wear and tear.
Once you’ve cast on your stitches, join them in the round by knitting the first stitch on your left needle with the first stitch on your right needle. Be sure not to twist your stitches!
Step 3: Knit the Body of the Beanie
Now that your stitches are joined in the round, it’s time to start knitting the body of your beanie. You’ll want to knit every stitch in every round until your beanie is the desired length.
If you’re using a basic knit stitch, the body of your beanie will be worked in stockinette stitch. This means you’ll knit every stitch in the first round, and purl every stitch in the second round. Repeat these two rounds until your beanie is the desired length.
If you want to add some texture to your beanie, you can experiment with different stitch patterns. Some popular options include ribbing, seed stitch, and moss stitch.
Step 4: Decrease the Stitches
Once your beanie is the desired length, it’s time to start decreasing the stitches to create the crown of the hat. To do this, you’ll need to knit two stitches together (K2tog) at regular intervals.
To begin the decrease, knit the first two stitches together. Knit the next stitch, and then knit the following two stitches together. Continue in this pattern until you’ve knit every other stitch together, and then knit the remaining stitches together. You should have half as many stitches as you started with.
Step 5: Finish the Beanie
Cut your yarn, leaving a tail of approximately six inches. Thread your tapestry needle with the tail of yarn and weave it through the remaining stitches. Pull tight to close the hole at the top of the beanie and weave in the ends.
Congratulations! You’ve just knitted your own beanie.